
What is Version Controlling ?
“Management of multiple revisions of the same unit of information.”
Version Controlling is managing changes to a source. These changes are identified by a revision number and each revision has its timestamp as well as the person who is responsible for the change.
Revisions can be restored, compared and managed.
Why Version Controlling is used ?
- Easier backups and centrelized source code repository.
- Easy collaborative development.
- Overview of changes performed to a file.
- Access Control.
- Conflict resolvement.
Terminology
Repository – Central location where all files are being kept.
Trunk – Also refered as master branch. Most stale code ( production code ) is being placed here.
Stage – Mark files for tracking changes.
Commit – Create a snapshot of changes being made to files.
Branch – Copy of the master branch taken in a given point.
Checkout – Mark/Unlock file for changing.
Merge – Combine branches together to update the master branch.
Merge Conflict – Changes that interfere other changes.
Best Practices
When version controlling there are some ways that should be followed inorder to get the best advantages. These are called as the best practices in version controlling. Some main best practices in version controling are as follows:
- Use a source control system.
- Always make sure to have the latest version of the file.
- Checkout only what you need.
- Merge code with development branch atleast once per day.
- Always make sure code is working as expected and not causing any other code to break.
- Follow a formal review process when merging.
Version Control Systems
There are many version control systems. Some popular Version Control Systems are:
- Git
- Mercurial
- CVS
- SVN/Subversion
Git

Git is the most popular version control system.
It is a distributed version control system which a client can get a complete clone of the source code and in a disaster situation full source along with all history can be restored from a client.
Its free and open source.
It can contain multiple branches and tags .(Feature branches, role branches).
It is faster comparing to other systems since it works on a linux kernel and written in C. Also it supports muliple protocols; HTTP, SSH.
Basic Git Commands
git init – initialize local Git Repository
git clone – clone Repository into a new Directory
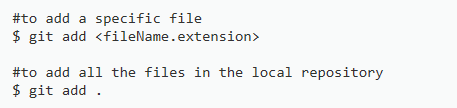
git add – add particular file to index
git add . – add files to index
git push – push to Remote Repository
git pull – pull latest from Remote Repository
git status – check status of working tree
git commit -m ‘ your commit message’ – commit changes made to files.
Now that we know what Version Controll is and what Git is and its basic terminologies, lets see how we can place a file under git.
STEP 0 : Make a GitHub Account.
If you don’t have a GitHub Account you can make a new account from here.
STEP 1 : Make sure you have installed Git on your machine.
If you are on a Mac, you can enter the following command in the terminal, this will prompt an installer if you don’t already have Git. If you have Git already, it will show which version of Git you have installed.

If you are on a Linux, enter the following command in the terminal:

If you are on Windows go to this link and download and install Git on your machine.
STEP 2 : Tell Git who you are.
You have to introduce yourself, mentioning your email address and username since every Git commit will be use this information to identify you as the author.

STEP 3 : Start Git
First create a new Repository on GitHub.
Then locate the folder that you want to place the git. Locating the folder can be done in various ways: you can use “cd” command in the terminal as follows to locate the specific folder,

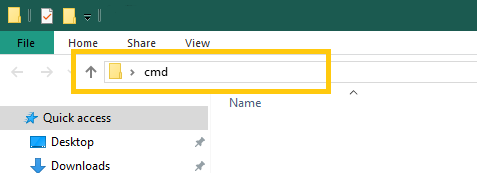
or if you are on Windows you can go to the specific folder and type “cmd” on the path tab and press enter.
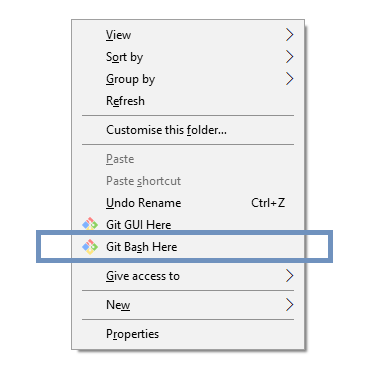
or you can go to the specific folder and right click and select “git bash here” option.
After locating the folder, Initialize Git using the following command,

Now you can create or change your project in this location and after the changes you have to add the particular files to the staging area for commit, using following commands:
Before committing we can check what files are staged:

It will lists all new or modified files to be committed. If it shows new or modified files you should have to commit those changes which you added to your repository.

The message inside the ” ” is given so that the other users can see what changes you have made. Also if you want to Uncommit changes you just made you can use the following command and unstage the files you just added.

Add a Remote Orgin and Push
Now each time you make changes in your files and save it, it wont be automatically updated on GitHub. Therefore to update the changes to the master:
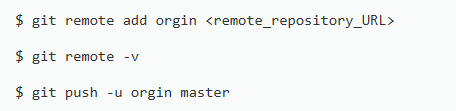
Now the “git push” command pushes the changes in your local repository up to the remote repository you specified as the orgin.
And thats it. You have just added the files to the repository you just created on GitHub.
But, How you download and work on repositories on GitHub ?
Cloning a Git Repository
In this instance also first you have to locate the directory you want to clone the repository. Then copy the link of the particular repository you want and enter the following command:

Git Pull
If two or more collaborating on a project, all the users are working on the same project and each time you make changes and push it into the master repository, others have to pull the changes that you pushed, meaning to make sure that all are working on the same latest version of the git repository.

And thats it for the Basics of Version Controlling and Git.


